Georectifying in the Wetlands
January 4th, 2012 by Stewart Long
cross-posted from PBS's IdeaLab. Making maps from balloon and kite flights in the dynamic coastal wetlands areas.
At Public Lab, we've grown the Grassroots Mapping community into a broader effort to enable communities to understand and respond to environmental threats with DIY techniques.
cross-posted from PBS's IdeaLab. Making maps from balloon and kite flights in the dynamic coastal wetlands areas.

Reposted from a Public Laboratory research note by Jeremy Crampton
The UK campus is getting mapped–with helium-filled balloons!
As part of an ongoing project associated with the Public Laboratory for Open Technology and Science (PLOTS) UK geography faculty and students have begun to map the campus from the air using balloons. The balloons, which are filled with lighter than air helium gas, are “tethered” with lengths of kite twine, to which a special camera rig (made from a recycled plastic soda bottle) is attached.
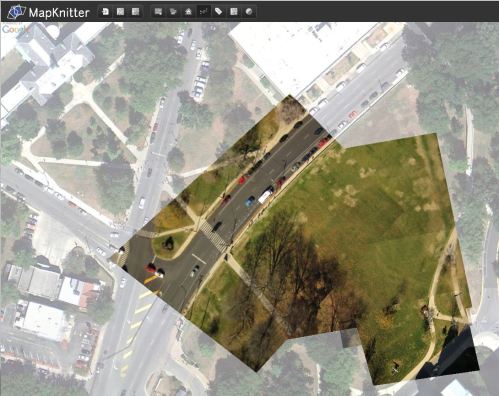
The camera dangles down and is set to take pictures every second. The pictures can then be “stitched” together in the PLOTS Map Knitter site.
This results in a composite image of the campus, which can be extended over time as more balloon missions are flown.
Follow our progress on the New Maps website!

This is a snapshot of some multispectral imaging that I have been working on with Pat Coyle at the organic agriculture park in Sunol, California. http://www.sagecenter.org/sunol-agpark/
near infrared tool:
http://publiclaboratory.org/tool/near-infrared-camera
Jeff Warren's NRG tutorial: http://youtu.be/Sfic43qRHqk
Warren on NDVI: http://youtu.be/-nNnWEHNO_w

Hello. I'm jaekyung lee from South Korea.
These days, I'm trying to get picture at 350 meters high.
Two weeks ago, at last I could get picture and return my camera and camcorder.
저는 한국의 이재경입니다. 퍼블릭라보라토리의 풍선맵핑을 참고하여 한국에서 도시맵핑 프로젝트를 진행했습니다. 약간은 방법에 차이는 있을 수 있지만, jeff의 방법 모델을 많이 참고했습니다. 한국에서 구하기 쉬운 재료를 사용했고 모든 내용은 퍼블릭 라보라토리와 구글 사이트도구에 한국어로 공유하였습니다.
https://plus.google.com/u/0/photos/101562321587581527568/albums/5680691848362713489
https://sites.google.com/site/urbanmappingwiki/

Students, faculty, alumni, and the community in general gathered to voice their disapproval of the pepper spraying of non-violent protestors on campus. The photo here is unprocessed, but a stitched one will be coming soon! The photo was taken with Stewart's helium balloon using a point-and-shoot camera and a smart phone took video of the crowd. The crew: Stewart, Liz, Michele, and Alex.
Written by Stephen Debique
On Friday, October 21st a diverse and multi-disciplinary group convened in Asheville, North Carolina to discuss, develop and prototype a low-cost, large scale, remote sensing system targeting the visible and near-infrared band combination. There were participants from all over the United States, including Public Laboratory for Open Technology and Science (PLOTS) staff from Louisiana, Massachusetts, and New York, a local Asheville remote sensing expert, and many others. We initially spent a few hours getting to know each other and Shannon Dosemagen helped usher along the introductions by posing some staging questions. Many participants expressed their keenness to learn and take what they learned and apply it in their individual work and research efforts. I also felt similarly and was very excited to work on a process that could possibly help a comparatively lesser-developed nation as my own, Trinidad and Tobago. After the lightning talks and introductions, a short presentation was given to us by RiverLink staff members, Nancy Hodges and Hayley Smith about the French Broad River, their conservation, restoration and remediation efforts. We were also given a brief overview of the areas where we would be launching our balloon mapping cameras over the course of the next day by Adam Griffith, of PLOTS. We were informed that we would be joined on Saturday by RiverLink volunteers who would also engage in mapping the local area with us. After this we all went out to enjoy some official Asheville vegetarian and vegan cuisine.

Getting ready to map the French Broad River
Saturday, October 22nd started with some breakfast from the local bakery and then back to the RiverLink headquarters for planning and dispersal into multiple teams. We split into three groups to maximize participation and learning amongst the 30 or so people gathered to help map the French Broad River surrounding areas. My group took on the Carrier Park, a greenway site, and was led by Jeffrey Warren and Shannon Dosemagen. They taught us the basics of setting up the camera rigs and basic flight planning that was unique to launching helium balloons. All of the participants seemed engaged and relatively amazed that one could use consumer technology to produce maps that seemed so ivory tower to them previously. After the RiverLink mapping mission was completed around noon we all met back at the RiverLink office to enjoy a Venezuelan lunch hosted by PLOTS and a local food truck.

RiverLink mapping group
After lunch we began to speak and work more intensely on our stated purpose – remote sensing using the visible and infrared bands. During the after-lunch session we were all led by Jeffrey Warren in hacking on Canon A490 model cameras so that they would no longer filter out the near-infrared band and would only filter the visible part of the spectrum. Most of the hacking was relatively easy and straightforwad thanks to the simple Canon design. One innovation we developed during our modest hacking process was to cut the filter and place it in the exact position as the manafacturer provided filter. This seemed like a straightforward idea but turned into some intense surgery which in my case needed nimbler hands. All-in-all, the whole infrared conversion process can be easily reproduced and should pose hardly any issues once the appropriate tools are available (specifically ultra-small jeweler screwdrivers and tweezers). Once we had completed our hacking session many ideas of how the technology could be used by a multitude of stakeholders were tossed around, with many agreeing that the high temporal resolution and ease-of-use were key factors in the usefulness of our grassroots process and system. PLOTS also was kind enough to donate one of the hacked cameras to my own small format aerial imagery research efforts. At the end of a long day we all agreed to reconvene at Adam’s house for an appropriate camp-fire dinner and post-discussion.

Stephen and Jeff work on the infrared camera
After breakfast on Sunday, October 23rd we all travelled over to Thatchmore Farm in Leicester, North Carolina where we were hosted by Tom and Karen, the owners of the ten-acre USDA organic farm; and Ashley, a farm apprentice. Although I had hoped that perhaps they would want to utilize the near-infrared spectrum for monitoring the forestry aspects of their 10-acre plot or for a low-cost method of monitoring crop health, Tom explained to us that one of his goals for using aerial photography was to help him document his recent efforts to expand his farming enterprise. After a short tour and pre-flight planning we split into two groups so that we could ultimately gain full geographic coverage as well as provide some failure proofing for our prototype cameras. We also tried dual-camera rigs, one taking natural color model aerial photographs and the other near-infrared aerial photographs. Both of our flights had minor issues with camera storage and weight, however, we managed to gain some potentially useful photography.

Thatchmore Farms
After collecting the geospatial data and grabbing a quick lunch we once again gathered at the RiverLink main office to hold a wrap-up session. The wrap-up session proved to be very fruitful and we all went away with a new sense of where this grassroots development should perhaps be heading. Some of the future work we agreed to follow up on included:
Site-specific goals at French Broad River
– ID invasive species, conservation easements
– MSD-sewage, straight-pipe sewage for tracking
– Species classification
– Open source classification using — http://www.dpi.inpe.br/spring/ – open source classification
Research goals
– Low-cost high-res DEM for farmers using bundle adjustment
– Reclamation sites – quantify lost biomass and diversity
– Bundle adjustment for canopy/biomass plus 4-band classification for diversity
– Crop health – relate to Thatchmore farm?
– Phosphorus limited? $5 test vs. ground-based IR camera system?
– Try blue-blocking single-camera IR setup. Need a way to get a pure non-infrared channel.
I was truly inspired by the work that we conducted over the course of the weekend and felt like one aspect of the system that I would particularly be interested in investigating is the application of small format aerial photography and remote sensing to planning New Agrarianism projects. Also worth investigating,are the potential spatial accuracy, radiometric resolution and spectral resolution short-comings associated with such grassroots, consumer electronics based technology and how these shortcomings can be improved so that the remote sensing system can be more broadly useful yet still maintain its democratic flare. On Sunday evening the barn raising came to an end and it was then off to our respective cities and towns, saying our myriad of sad goodbyes, yet welcoming new opportunities and ideas for bettering our planet.
20:15, 2011 10 11 London, UK.
Original post here : http://www.designandenvironment.co.uk/2011/10/aerial-mapping-session
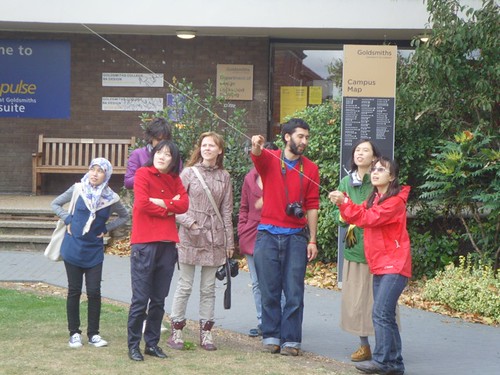
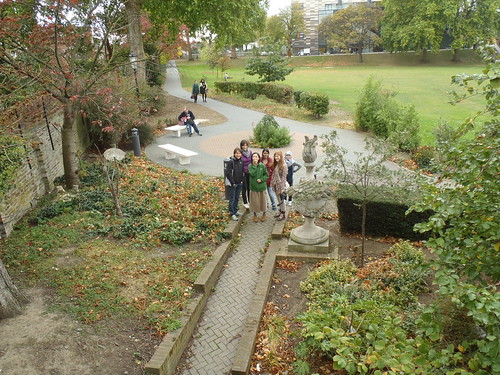
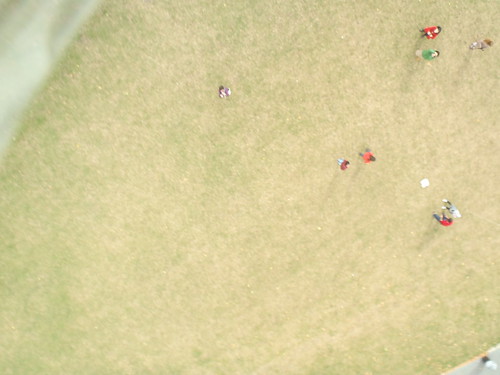
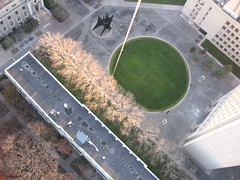
Today, we went out mapping, or more precisely doing aerial photography, flying a digital camera under a nice big green balloon from the green of Goldsmiths University London. The MA is Design at Goldsmiths has an option called “Design & Environment” supervised by Prof Jennifer Gabrys. It is a course that initiates students to alternatives design and environmental methods and pratices. This hands-on experiment was lead by Cesar Harada acting both as Goldsmiths tutor and Public Laboratory instructor. The mappers -who are also the authors of this post- were Anuja Uttamrao Borker, Inessa Demidova, Shan-Yu Hsu, Dk Hajah Hazwani Pg Dato Haji Jaberudin, Federica Sterpos, Chian-Yun Yang, Yifan Zhang, Elvira Grob (group picture).
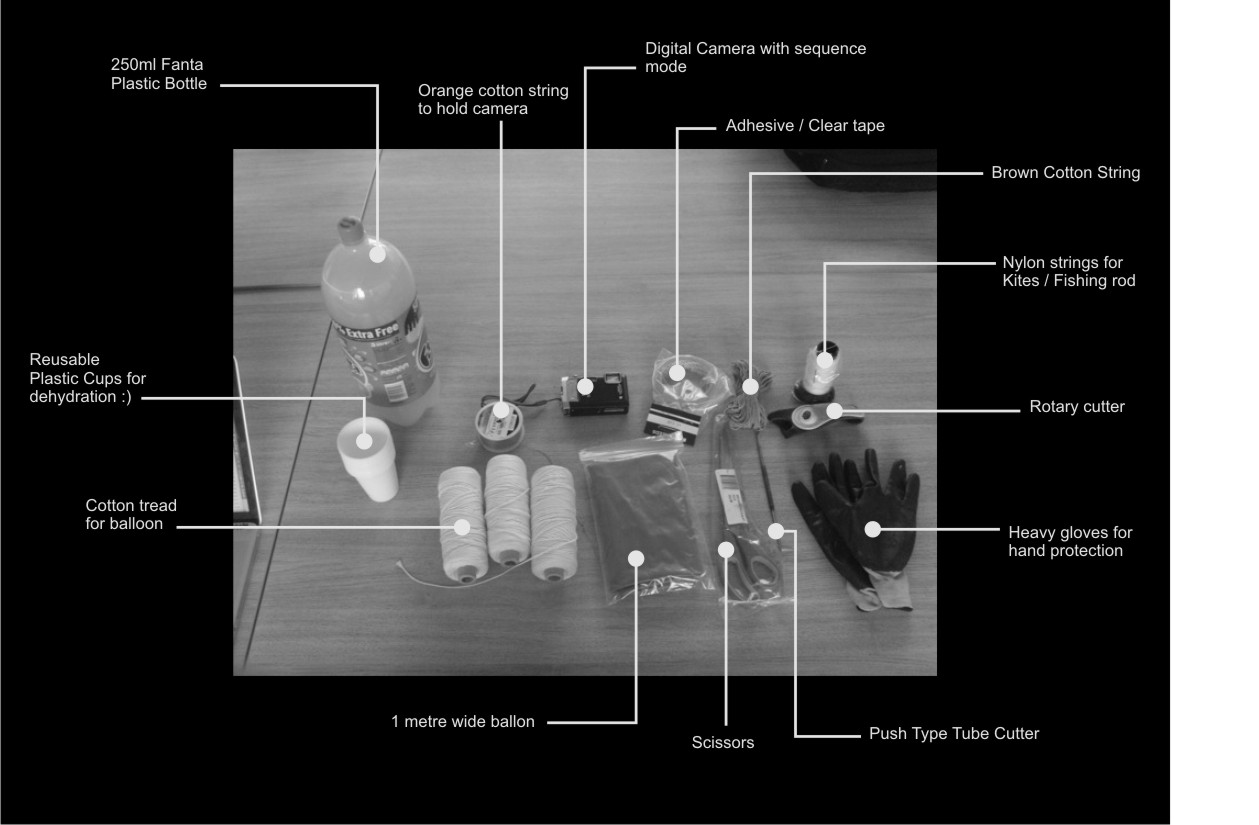
<Hazwani> The purpose was to capture many images of Goldsmiths open-field area and its surrounding. In order to have these continuous green images, we created a flying balloon digital camera. We did not need complex materials to make it.
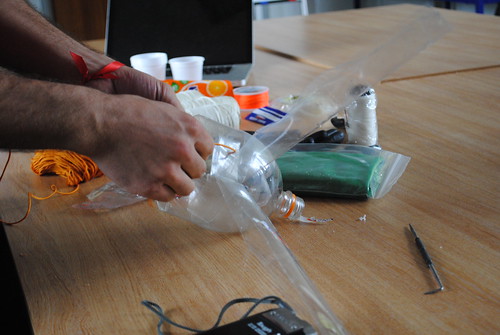
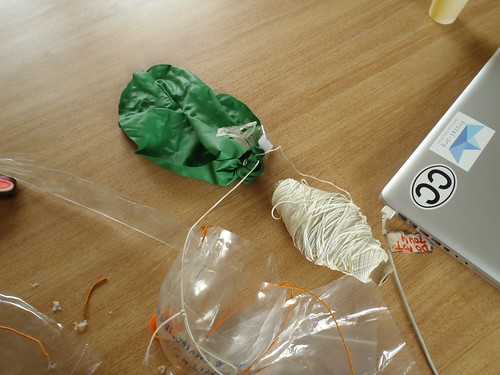
First of all we cut our 3l Fanta plastic bottle into half in order to place the digital camera inside the bottle top, attached with orange string onto our camera and through the bottle neck. Instead of the rest of the bottle ends up in the bin, we used it to create wings so that it becomes stable once it is up in the sky. We cut it into strips and fold them so that it became straight and folded as a rotor blades. In order to ensure the strings would not slip away, we had to make sure the cotton string was tightly taped down onto our camera.
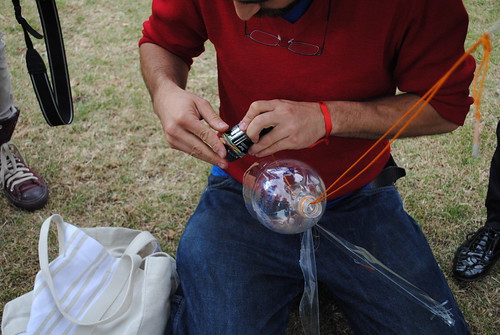
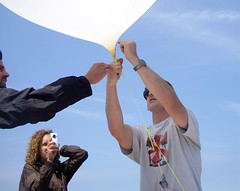
Once we got everything prepared in the studio, all of us and our tutor then rushed our way behind Lockwood Building to inflate our 1 metre balloon slowly with helium. While filling the balloon, Shanyu, Fedrica and Elvira helped our tutor to hold the huge balloon so that it would not touched the ground and the things around. The other four of us were taking pictures and making notes of the process.
Before we launched our balloon, we had to make sure that we set our camera on continuous mode. Then we added a bit of card paper to hold down the camera trigger and used few rubber bands to hold the paper in place. Afterwards we put on the Fanta cap once the camera was securely in place. Make sure you test bounce your camera beforehand so that it would not fall out.
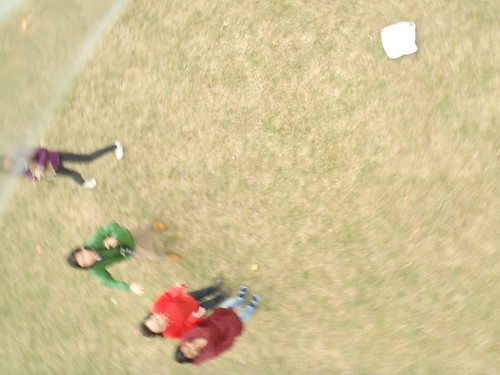
Roughly about 12pm at Goldsmith open field, we let our balloon rise up into the sky as quick as we can so that the wind would not prevent us from letting it rise and we take turns to wind the strings carefully. We also had to make sure that we wear protective gloves beforehand, in order to protect our hand form getting string burns and ensure that we do not let the string tangled up. We flew for almost an hour and a half mapping the green field – and the materials to make were just simple! </Hazwani>
<ChianYun> It was a cloudy day, not perfect for taking pictures. The wind was generally from the west, sometimes changed its direction. It blew strongly. Once we passed building high, the wind became too strong and limited the rising of the flying balloon, made it difficult to control the balance. At least, it didn’t rain. </ChianYun>

<Shanyu Hsu> The big balloon gradually flew into the sky. Because of strong wind, the balloon moved horizontally rather than vertically. In order to avoid it from hitting the main building, we tried to pull back the line connected with the balloon for a while and then released it again, such as playing kites, for a couple of times. Luckily, the balloon flew higher and higher. The flight route of our balloon was determined by the strength and direction of wind.</Shanyu Hsu>
<Federica> The wind brought the balloon close to the trees, we could not control the balloon or change its course. The balloon exploded and crashed into a tree. Our tutor Cesar Harada climbed up to the roof to go and check the camera. Everybody was worried the camera would be broken… and if the experiment would be failed… The tutor finally found the camera with the rest of the material in neighbours garden.</Federica>
Pictures Cesar took after he found his camera following the crash, we are so emotional on them!
<Inessa> When we finally got to our classroom and saw photos it turned out that the camera switched off shortly after the start of ballooning, probably the rubber band slipped off the button. As a result we have got only a few pictures and most of them were quite blurry. </Inessa>
<Anuja> So, in spite of the bad weather conditions, we got a few good pictures. Most importantly, we learnt a useful technique in photography and mapping. Hopefully, we will have better luck with the weather next time and it will be bright, sunny and non-windy. But overall it was a fun, educative and interesting experience.
The “broken rig”
The next step would be to go map again and stitch the photograps to form a single map of the entire area.</Anuja>
<Inessa>To do so we need to use specialized software of Adobe Photoshop. Some kind of panorama-making software might be used to automatically stitch photos and get pretty neat aerial view of area with all the details. After that this images might be used for a wide range of purposes. </Inessa>
</Yifan> Mapping can be used for field-based research but can also be used for divergent thinking in a very wide range of field.

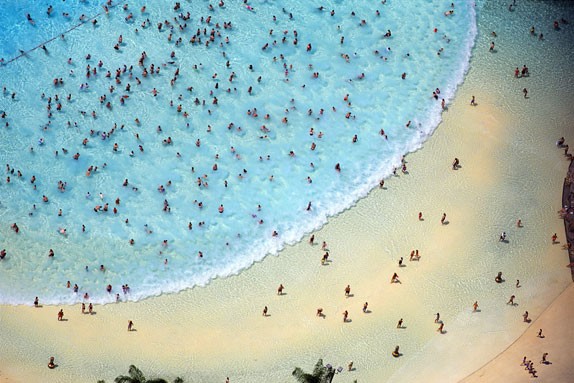
Image found here.
Aerial mapping can be a useful tool to analyse a location from the past to present day, tracking its development over time. For Example, it can be used in urban planning (architecture, landscape and etc.), human and animal habitat study, to give people a clear indication of how a development may impact the environment.
From a historical perspective, mapping has been used in a vast diversity of fields, from scientific to artistic to critical political purposes. Not only the scope of mapping has been rapidly developed, also the technologies have progressed.
The contemporary use of aerial photography can be seen from different scales of work, such as environmental projects, film shooting and city planning. It gives an opportunity to both professional and the general public to have an intuitive understanding how themselves relate to the whole, and think out of box! </Yifan>
<Inessa> The main feature of “grass-root” mapping is that it is relatively inexpensive and allows us to create quite high-quality images with relatively small efforts, that can be used by almost everyone who need it. So, not only government and big corporations, but small organisations and even students can get all the advantages of aerial photography.</Inessa>
<Cesar> PS : We still have a lot of helium in the cylinder – for possibly 2 flights. The weather conditions were not very good today unfortunately, who is interested in doing another mapping session? Please say it in the comments 🙂
For UK reference, we ordered our equipments here :
Special thanks to Jane Godsal, UK-based-Balloon-artist for her precious advices ! </Cesar>

Post written by Oscar Brett
Arriving at Zucotti Park in downtown Manhattan, the site of #Occupy#Wallstreet, you can feel the energy of the crowd. The level of diversity (ideological/ ethnic/ generational) is unbelievable. The Occupation of Wall Street began on September 17th and it is getting stronger each day. I see my involvement in the park as that of a community builder and artist. The maintenance of a community at Zucotti park is an incredibly important thing; no matter how disparate the media claims the thousands of occupiers to be, there is one thing for certain — they are a community made up of individual people, with varying goals and intentions, voicing their dissent for the systemic problems of the world. Political, ethical, legal, societal, economic qualms are all being voiced in this space, but a major issue exists: how do you bring the animal rights expert together with the Marxist economist, the LGBT advocate together with the anarchist; how can so many ideologies gel?
My role has been to try and unite people through communal exercise which takes the form of public (or community) based art– this was exactly the purpose of using community involvement to build, and fly, a weather balloon rig and map an #Occupy#Wallstreet march on October 5th.
This project would have been impossible without the help of Leif Percifield and Liz Barry. On the night of October 4th, I met with them and they supplied me with all the equipment I needed: line (2x 40lb of 250ft and 1 100lb of 250ft), a 4GB sd card, and a supply of tape. The SD card was loaded with a script that enables a Cannon Powershot to shoot continuously without having to hold down the shutter button.

Later that night I took a 2am train to the Lower East Side to purchase a Cannon Powershot A495 (a lightweight point and shoot which is great for flying) that Leif located on Craigslist. By 4am the camera casing was built and the camera was ready for shooting the next morning. The actual construction of the rig would occur at Zucotti park the following morning.
Upon arrival at the park the next day I linked up with the #Occupy#Wallstreet media working group and began preparation for the flight. The media working group funded the balloons and helium; 100 12inch rainbow party balloons were purchased (pre filled) from Balloon Saloon on West Broadway and Duane, costing $125. The balloons arrived at the park at around 2pm, one hour prior to the march. I preemptively cut 10 lines of 10ft cotton chord to be used in the rigs construction. I attempted to get as many people involved in as many elements of the construction as possible; I hollered at people in the park to hold this, cut that, or wind these. People were very excited to take part in any form of constructive action.
The construction of the actual weather balloon rig engaged between 50 and 75 occupiers. The police have vetoed our right to use forms of voice amplification, which has spurred an ingenious and highly democratic approach to addressing a crowd. A metaphysical device called the “peoples’ mic” was created. The addressor yells “Mic check!” and everyone who can hear her/him responds by echoing “mic check”, the addressor then speaks in short sentences and allows for the chorus of people closest to them to echo what they are saying. It is in this way that the message is passed through a large crowd [each message often has upwards of 3 echos from the first people who hear it to those on the periphery of the crowd]. I utilized the “peoples mic” to address those who were constructing the rig.

I addressed the crowd and asked 10 people to pick up the ends of the ten strings; an additional person then secured each of the ten strings to a key ring. This produced a circular decapus (think octopus) structure of cotton line about twenty feet in diameter. I then held a small lesson on tying very basic slip knots and instructed folks to tie ten slip knots on each line (aprox. 1 foot apart from each other). This task of tying 100 slip knots only took about 10 minutes because there were at least 25 to 30 additional participants tying them. Even more people cued up in front of the two massive bags of inflated balloons to pick up one balloon at a time, insert the balloon ties into the prefabricated slip knots, and tighten them. I was amazed at the fact that not one balloon popped or flew away during this operation. The free ends of ten balloon strings were then secured to an additional key ring and let go to rise into the air. This produced in theory a balloon globe; however, in practice it resembled more of a bundle. People were very excited to be taking part in such a communal event. There was constant giddy dialogue between the participants, exchanges of numbers and contact information, and a general good vibe.

The Balloon bundle was attached to a fishing clip, via its bottom key ring and the two 40lb lines and the 100lb line was attached to the clip. The decision to use three lines to control the rig was made for two reasons. First we felt it would be easier to control the rig in the narrow space between skyscrapers with three points (a triangle) on the ground; and second, we were not sure how police would respond so we wanted to ensure the return of the images even if one of us was handcuffed/ tackled by the police [the plan was for the remaining two pilots to pull the rig in immediately and secure the SD card if the third one was immobilized by police].

The process of mapping began at the north east corner of Zuccotti park just as the march began; It had been previously disclosed to me that the march would attempt to cross the Brooklyn bridge so the 15 block walk from Zuccotti seemed not to daunting a distance. Myself and two other members of the protest controlled the reels, there were probably five other marchers who constantly stayed with us either documenting, aiding in communication between us three controlling the rig, or reeling in excess line at moments when time was of the essence.
We made it about two blocks up Broadway successfully, before our first snag occurred. Upon hitting a cross street a gust of wind blew one of the lines into the crux of a lamp pole. Our solution was to fly the balloon close enough to the lamp pole (using the other two balloons) to slacken the stuck string. This same problem occurred at least three more times, and one of the times we had to cut and reattach one of the three lines.
Our plan was to start at the front of the procession and walk slowly so as to allow for the entire procession to pass us by the end of the march. By starting at the front and ending at the back we believed we would produce both a map of the physical route taken by the processors as well as allow for the full documentation of all marching bodies in space. In practice this was made difficult by multiple factors; the corralling of people by the police inhibited us from moving freely between both sidewalks and the street, the unpredictable nature of the crowd speed, as well as issues of tangling lines. We took the balloon down and put it up pretty frequently, at one point there were low hanging trees at another there was scaffolding; needless to say we didn’t photography the walk in its entirety. Among the best imagery we gathered was the walk from Printing House Square to half way down the Brooklyn bridge as well as the police barricade on the Brooklyn side of the bridge. We also gathered some pretty good shots on the walk up Broadway from Zuccotti park.
This map was made using Mapknitter, an open source program that allows for direct manipulation of photographed images over a satellite backdrop, I used a google map backdrop. View the map here: http://mapknitter.org/maps/2011-10-01-newyork-occupywallstreet
Special thanks to Zach, Tim, Blaine, Yaeir, Anjali, Louis.
–Oscar Brett
![]()
Are you embroiled in an cartographic dispute? Do you disagree with the official version of your geography? Contact us through the public mailing list.
Grassroots Mapping is part of the Public Laboratory for Open Technology and Science, founded by a group of activists, educators, technologists, and community organizers interested in new ways to promote action, intervention, and awareness through a participatory research model.
We're now trying to learn from our balloon mapping experiences to develop new DIY tools with a variety of local communities. This is an open community and you are welcome to join, and encouraged to contribute!

Purchase the Grassroots Mapping Forum, our new community research journal/archive/zine/map, where we hope to share ideas, techniques, and stories from the Grassroots Mapping community. It is printed on a single 22.75x35" newsprint sheet, folded down to just over letter size, and includes a full color reproduction of a grassroots map along with essays, illustrated guides, and interviews on the reverse.
You can find out more, and purchase the first issue here for $17 shipped.
We're helping citizens to use balloons, kites, and other simple and inexpensive tools to produce their own aerial imagery of the spill… documentation that will be essential for environmental and legal use in coming yeas.We believe in complete open access to spill imagery and are releasing all imagery into the public domain.
You can see all of our data here: http://publiclab.org/archive/.
Browse some of our best imagery on Flickr.
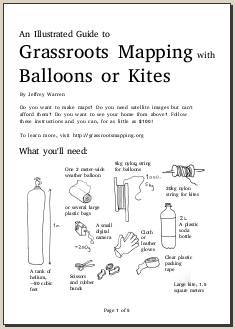
Techniques and tools for people who want to make maps, on the Public Laboratory wiki. Includes readings and case studies on grassroots mapping projects.
Instructions on how to use cameras on weather balloons to create high-resolution maps.

Want to start mapping? See the Balloon Mapping Materials List to get started.